Pages

Pages

Monday, October 31, 2011

White Metal Casting Tutorial

A step by step walk through on how to cast you own small figures in white metal aka pewter.
Items needed

From this retailer:

List of materials needed:
A heat resistant work area (I use the slab of green marble shown in this pic)
Mold Rubber                                          $20.00
Mold Vulcanizer Tool                             $95.00
HDF or Masonite mold clamp boards       $0.50
Heavy Duty spring clamps                        $4.00 (local DiY store)
Melting Pot                                             $72.00
Pouring Ladle                                           $6.00
10oz Ingot                                                $7.50
Talc powder / baby powder                      $2.00 (wal-mart)
Heavy Duty gloves                                    $4.00
Shipping                                                 $17.00
Total around $230 shipped to a US address


So understand its a hefty investment to be able to make 1 mold and cast 10oz worth of metal figures.  
  1. If you mess up the mold making step you just cost yourself around $20.00. They have a bulk deal for 5 or more blanks each one is reduced to $15 each.
  2. To make 2 metal figures like the 2 small ones I used in this example uses 0.84oz of material, so you will get approximately 11.9 figures (obviously YMMV depending on what is cast).  Good news is you can remelt miscasts.
  3. So to break even; assuming you buy one mold blank and 5 ingots ($260) you would need to cast 59 figures (barely possible) @ $5.00 retail ($295).  However with all the reliable discount web stores offering %20 discounts and cheap/free shipping you are still in the hole in money spent and time used.
  4. So If you are thinking gee I wanna be a recaster and flood eBay and trading boards with high quality metal recasts of some other companies IP understand its probably not worth the effort and cost.  
  5. If you want to make casts of your own creations that are worth selling at a premium price, this is probably a decent option for you.


I purchased my setup around mid 2001 and spent considerably less that the current costs. I wanted to finish out a very large army of high cost metal models that at the time were hard to get in the specific pose I wanted (random blister packs), and there was not reliable discounters.  My break even point back then was around 45 models I wanted 60ish. 

First Steps
  1. Place a new blank in the vulcanizer tool dust both sides of the tool with Talcum (or Baby powder), the uncured slabs are smaller than the cavity and will expand when heated causing rubber to squirt out of the tool like a hard toothpaste.  Remember this when later when baking it, you will want a catch tray underneath the tool.
  2. Lightly place the original to be cast on one slab of the rubber, you may be able to place 2 small models on the slab leave around 1/4 inch of room to any edge and any other model.
  3. Because you obviously plan on casting you own designs know the following.  A green stuff master can withstand 3 vulcanizations (per the kneadatite website).  Also your GS master must not have a plastic core because of the time at the required heat and pressure.
  4. Once you have lain out where you think you want the models to go remove a small amount of the mold rubber making a cavity smaller than the master (around 1/3 of the volume of the original), you will repeat this on the other half of the mold rubber.
  5. Place 4 of the register keys into one side of the mold, all four facing the same way.  The flat edge of these should be flush with the top of the slab of rubber that you push them into.
  6. You may also want to use a metal pour gate, instead of cutting it your self later from the cured mold.
  7. Now that the original(s) is on one slab lightly dust the slabs with Talcum powder.
  8. Close the tool, tighten the hex screws, and remove the wooden handles.
  9. Place in the oven at 400 degrees for an hour.

Mold Vulcanizer & mold blank


register key nuts and pour gate


Mold blank & Vulcanized finished mold (top)
Open Vulcanizer with an uncured mold blank


Cured Mold Prep

  1. Let the sucker cool down, be patient
  2. Remove the mold from the tool, this will be easier if you have a wooden stir stick / Popsicle stick.  The mold has expanded to fit the cavity of the tool and will require some wrangling.
  3. Pry the halves apart and remove the masters.
  4. Cut your pour gates (how the molten metal gets into the cavity)
  5. Cut vents if this is your first mold try a casting or two and see if any area is not getting metal into it.  This will usually be the ends of gun barrels or horns etc

Completed mold with pour gates and vents cut


Cutting tool, used to remove cured rubber


Hot Metal Time
  1. Have a heat resistant work surface and gloves, molten metal will eat your face/skin right off (Like the Honey Badger (Honey Badger doesn't give shit)
  2. Your mold needs to be hot, a cold mold will cause the molten metal to setup too fast and your pour won't fill in all the detail.
  3. Once you mold is hot if you are having miscasts then you might need to cut vents see photo above.


4lb capacity melting pot, ladle, and pewter ingot


Saturday, October 29, 2011

Project Compendium Chapterhouse Wheeled Chimera

This is a compilation of the WiP posts for the resin wheeled chimera conversion kit sold by Chapterhouse Studios.


Here is a walkthrough and review of the kit.

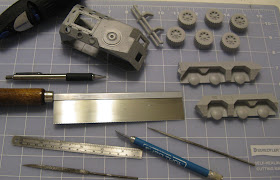
Parts and needed tools.

It does not fit together, at all.  If you do not have a dremel tool, good razor saw and files this kit is not for you. If you have not worked with resin kits before and do not have patience skip this one.


I spoke to the CAD designer of this kit about these issues on the DakkaDakka forums he frequents.  He told me this.

"The kit was designed with the older chimera sprues in mind, so when GW made the change to the new sprues there were some issues with assembling it. The angles of some of the Chimera hulls pieces are very subtly different. This has to do with the draft angles GW uses... draft angles are the slight angle applied to a model so that its easier to remove the plastic sprue from its stainless steel injection mold. The old chimera kit of the 90s was made with an older technology and so some the angles were more extreme while the newer kit could get away with shallower draft angles. 

This reality compounded with some slight inaccuracies in the 3D printied parts conversion into a master resulted in the 1st generation models not fitting with the new kits. Nick over at CHS, told me that after the first run, he had the masters corrected... so from what I know the second gen castings should work with the modern Chimera."


The areas in black sharpie on the side panels is material that I had to remove for this kit to begin to fit together.


In this photo you can see the saw being held flush to the side while cutting the excess material away.


Here is a photo from the other angle, you can see that you will be leaving a small amount of resin less than 1/8th inch thick.


Now the sides fit the plastic box and we can get to the gaps that need to be filled.


After My first WiP post Nick (the man behind Chapterhouse Studios) commented on my post.


"The reason why you had to make so many cuts is because you modified how the sides fit on the center hull. The kit should have fit fine if you used the existing cuts, but you wanted to move the side hulls lower in relation to the center hull.
It also looks like you moved the center hull forward relative to where it fits normally on our kit.

Do you have any photos of how it fit before you tried to modify the resin pieces? Looks like you did many cuts to modify how you wanted the kit to fit and that was a PITA (as is cutting resin).

Send nick@chapterhousestudios.com an email asking how it should fit to save yourself some trouble if you have questions."

To the left is a picture from Chapterhouse's website of one they painted up, you can see the misalignment next to the heavy bolter.  While talking to the designer he indicated that this is incorrect.  If you assemble the kit with out modifications listed above you will end a misaligned kit like the one shown at the left.
My reply to Nick:
"To answer Nick @ Chapterhouse (thanks btw) I aligned the side panels using the angles on the plastic chassis and the rear door as seen in these 2 photos.  Had I used the existing register keys on the resin kit the side panels would have been shifted up about an 1/8 of an inch resulting in a gross mismatch and a bad looking kit."


I added a small strip of plastic to the bottom front of the chassis to bring the bottom of the hull in-line with the side panels and to give me an hard line to bring the filler up to.  Other than the gaps visible in pt1 this is the other major area to work on. this is a result of the original sculpt not having the right angle to line up with the plastic chassis.  A problem but not bad considering its a resin/plastic hybrid made by 2 different companies (also the front bumper piece will cover much of this up).


I was going to fill the front gap with GS but changed my mind and went with a thin band of plastic card. so that I could have a smooth finish.  In the left hand corner of this photo you can see some GS building up the edge of the vehicle.  Once I got the GS sanded level with the plastic chassis it began to peel away b/c it was so thin.  I had to use a different method to fill this area and build it up to a proper flat panel.  I used Baking soda and super glue to fill it.


For those that are unfamiliar with the method, Baking soda is a super glue accelerant and filler. Pack the gap level with baking soda and add a drop or two of thin super glue, it will set nearly instantly and be nearly transparent. It is actually over the GS in the above pic.

I am changing the front end a little bit, the bottom half will be set at a slightly different angle using another band of plastic card and then it is ready for the bumper.


Speaking of the bumper, this is the only piece to have any bubbles or voids (seen in black sharpie) and they are small & easy to fix.    Far better quality control on the casting side than Forgeworld, Finecast, or most other resin companies I have used.


Almost finished, front panels have all been sanded and blended.  Once again this was done with greenstuff for the deep gaps and superglue & baking soda for the very shallow voids. Then wet sanded with 400 grit sandpaper.

I have decided to remove most of the rivets, and at least prime it in a very nice shade of gray.  


Front panel before filling and sanding.
Front panel after sanding.

Primed and Ready to Go


You can see that the panels now line up (I also removed most of the rivets), compared to the CHS picture showing the panel misalignment.


Friday, October 28, 2011

WiP Tyranid Swarmlord pt3

Weekend Update:
Legs, Head, & Tail.

Seriously with a title like that how can you go wrong?

Legs about %85 complete


I need to fatten up the thighs a little bit, going for that softball player look.


Making the primary horn

Still need the extended goatee and talon thingies on the sides of the mouth


Tail section


Built up with brass rod and first layer of green stuff.


Tuesday, October 18, 2011

Buyer Reviews / Chapterhouse Studios Farseer/Warlock on jetbike


As a retail business owner and an avid hobbyist I often find myself looking for other buyer reviews before buying from webstores. I thought I would start a series of reviews on the webstores I have purchased from and the products I have bought. I hope this is helpful to you all.

This time Chapterhouse Studios again, I wanted to get the Farseer and Warlock jetbike conversion kit.


If you look you will see that the Spear on the bottom left sprue is broken, a replacement was included in the package.  It was nice to see that the company caught a miscast and included the needed parts in the pack without a need for the end buyer to complain.  Forgeworld and Failcast should take note of this level of attention to detail.

Again Chapterhouse was great to work with the sculpts and quality of the casts were great as well.
A+

Saturday, October 15, 2011

Buyer Reviews / Chapterhouse Studios Lashwhips


As a retail business owner and an avid hobbyist I often find myself looking for other buyer reviews before buying from webstores. I thought I would start a series of reviews on the webstores I have purchased from and the products I have bought. I hope this is helpful to you all.

This time Chapterhouse Studios again, I wanted to get the Tyranid lashwhip kit.


These look great, but the size is way off in my opinion, so much so that for me they are unusable.

Once again Chapterhouse Studios was great to work with, but I cannot recommend this product.

Thursday, October 13, 2011

The Red Terror

The Red Terror
This was painted for me by Neverness check out his blog over here nevernesshobby. This was a commissioned project, Neverness offered to paint a unit or character for the winner of a tournament.


Custom Tyranid Hive Tyrant Wings Pt. 5

Light at the end of the tunnel.

Comparisons with Forgeworld warrior wings


After checking out the FW wings I have decided to match the style, the armor plates at the joints and elbow,  the armored section around the hand structure, and the way the membrane joins up to the skeletal/chitinous  structure

Wednesday, October 12, 2011

WiP Tyranid Swarmlord pt2

Progress Update.

Waist & Tail extended and armor plate added


Torso & Tail dry fit


The last two pairs of vents still need to be extended with GS.

Comparison shot


Projected height of Swarmlord vs standard Hive Tyrant and Trygon.


Buyer Reviews / Paulson Games Alien Parts


As a retail business owner and an avid hobbyist I often find myself looking for other buyer reviews before buying from webstores. I thought I would start a series of reviews on the webstores I have purchased from and the products I have bought. I hope this is helpful to you all.

This time Paulson Games, I found these while looking for Tyranid upgrade options.

Eye Candy first:
Hive tyrant sized bonesword, compared to current ed. bonesword shown with cut down tyranid arms to be mounted onto.


Lash Whips compared to current ed. tyrant whip.  The top two arms are MC sized arms the third is from a warrior kit. These whips are made to be bent to shape, either place them in hot water (not boiling) and bend to shape or use a hair dryer to warm them.


Warrior sized boneswords. shown with arms from the warrrior kit and the rending claws from the same kit.


A few things to know, these are labeled as alien parts so a carzy company with even crazier IP lawyers don't go totally nuts.  Also I suspect the seller does not have pictures of the product on said crazy companies finished models to avoid any need for the IP gestapo to be kicking down the front door.


Paulson Games was outstanding to deal with, the product arrived quickly.  The quality of the sculpt is fantastic and the resin cast quality is also top notch. A+ all around
If you are a Tyranid player go now and order some of these.

Tuesday, October 11, 2011

WiP Tyranid Swarmlord

I have been running two conversion projects at once, to fill the down time while waiting on green stuff to cure.

Starting Bitz;


I am going to be using a Trygon torso and 2 Trygon head plates (not pictured), plus a set of Carnifex legs and tail, standard Carnifex head and standard Carnifex armored plate (not pictured either).


Torso modifications:


I removed the 2nd and 3rd ridges from the armored plate,  I would later go on to remove the first two back vents as well.


Torso modifications step 2:


Here you can see the Carnifex armored plated and additional green stuff vent that has been added to the torso.  The Carnifex tail section has been lengthened so that the torso and tail/waist will fit correctly.  The tops of the Carnifex legs have been widened and Trygon head crests have been cut into armor plating for the thighs.

Leg conversion process
Thighs removed from legs
Thighs cut in half


The Carnifex thighs were removed with a jewelers saw, the cut in half with a standard hobby razor saw.  The thighs were then widened by gluing the halves to a 1/8 inch thick piece of plastic card and sculpting/sanding it down to match the original contour.  Your can see the white plastic card in a photo above this.

Torso comparison:
Trygon torso vs Hive Tyrant torso


 Trygon torso:
Beginning to blend the Carnifex armor plate into the torso and have added the first 2 green stuff vents.
 

Monday, October 10, 2011

Custom Tyranid Hive Tyrant Wings Pt. 4

Update Time.

More green stuff added, wings have been smoothed to remove previous texture.


Bottom side, starting to apply green stuff.


The steps between green stuff take a lot of time to dry, so I have started a second project.