Friday, September 16, 2011

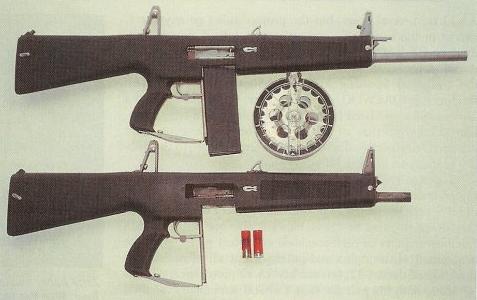
Full auto shotgun the AA-12


This will be a departure from my normal hobby posts.  I was fortunate enough to be invited out to see the production shop and test out the Full automatic shotgun AA-12.

 I handle a business account for the owner of the company, who also engineered the redesign of this weapon system.  I got to see remote controlled building clearing armed treaded robots, remote controlled armed helicopters, and a ton of incredibly cool weapons in development.
A big thanks goes out to Jerry for the invite and tour.


Thursday, September 15, 2011

Chapterhouse wheeled chimera pt 4


Base coat of primer and many rivets have been removed.  I am very happy with the finished product on this kit.  Stay tuned for my next post, it is not gaming related but promises much awesomeness.


Just a little hint.

Monday, September 12, 2011

Chapterhouse wheeled chimera pt 3


Almost finished, front panels have all been sanded and blended.  Once again this was done with greenstuff for the deep gaps and superglue & baking soda for the very shallow voids. Then wet sanded with 400 grit sandpaper.

I have decided to remove most of the rivets, and at least prime it in a very nice shade of gray.  So that it is both painted and capable of annoying Corey at the same time.


Front panel before filling and sanding.
Front panel after sanding.

Tuesday, September 6, 2011

Chapterhouse wheeled chimera pt 2


To answer Nick @ Chapterhouse (thanks btw) I aligned the side panels using the angles on the plastic chassis and the rear door as seen in these 2 photos.  Had I used the existing register keys on the resin kit the side panels would have been shifted up about an 1/8 of an inch resulting in a gross mismatch and a bad looking kit.


I added a small strip of plastic to the bottom front of the chassis to bring the bottom of the hull in-line with the side panels and to give me an hard line to bring the filler up to.  Other than the gaps visible in pt1 this is the other major area to work on. this is a result of the original sculpt not having the right angle to line up with the plastic chassis.  A problem but not bad considering its a resin/plastic hybrid made by 2 different companies (also the front bumper piece will cover much of this up).


I was going to fill the front gap with GS but changed my mind and went with a thin band of plastic card. so that I could have a smooth finish.  In the left hand corner of this photo you can see some GS building up the edge of the vehicle.  Once I got the GS sanded level with the plastic chassis it began to peel away b/c it was so thin.  I had to use a different method to fill this area and build it up to a proper flat panel.  I used Baking soda and super glue to fill it.


For those that are unfamiliar with the method, Baking soda is a super glue accelerant and filler. Pack the gap level with baking soda and add a drop or two of thin super glue, it will set nearly instantly and be nearly transparent.  It is actually over the GS in the above pic.


I am changing the front end a little bit, the bottom half will be set at a slightly different angle using another band of plastic card and then it is ready for the bumper.


Speaking of the bumper, this is the only piece to have any bubbles or voids (seen in black sharpie) and they are small & easy to fix.    Far better quality control on the casting side than Forgeworld, Finecast, or most other resin companies I have used.

Friday, September 2, 2011

Assembling a Chapterhouse wheeled chimera kit

So I got a wheeled chimera upgrade kit for my Necromunda Arbites.


COMPLETED PROJECT SUMMARY HERE


Here is a walkthrough and review of the kit.

1 It does not fit together, at all.  If you do not have a dremel tool, good razor saw and files this kit is not for you. If you have not worked with resin kits before and do not have patience skip this one.


The areas in black sharpie on the side panels is material that I had to remove for this kit to begin to fit together.


In this photo you can see the saw being held flush to the side while cutting the excess material away.


Here is a photo from the other angle, you can see that you will be leaving a small amount of resin less than 1/8th inch thick.


Now the sides fit the plastic box and we can get to the gaps that need to be filled.


Sunday, August 28, 2011

Ultrasonic paint removal

So if you have been in the gaming hobby for long, you probably have either wanted to remove paint from something you painted while learning how to paint, or you have bought miniatures on eBay with the description of "Pro Painted".  Then this post is for you.  I often see people posting questions on forums asking how to remove paint.  This is what has been working well for me.


Option 1, Straight Super Clean.
Super Clean, I buy at from Wal-Mart for around $8.00 a gallon its in the automotive section.

It eats paint, superglue, and softens green stuff.  I has been safe to use on Plastic, Metal, and Resin models.  It does not de-bond plastic cement.

Use it warm (around 100-100 degrees) for faster results.  Or you can let it set in a covered container and soak.  You will still need a toothbrush to scrub off the small bits and recessed areas.


Important:

  • It eats paint, like on cars and walls, it probably would damage some types of counter tops.
  • It eats thin medical gloves.
  • It breaks down the oils in you skin and will dry you out, so wear heavy duty chemical gloves.
  • It can be reused I have a couple of rigid reusable coffee filters that I strain out the bits out paint with every once in a while.


Option 2, Ultrasonic cleaner with Super Clean

If you can get one of these on the cheap you should. Speaking of eBay, I picked this sucker up on the cheap ($65vs $400 + retail) on the good ole eBay.  This is a Spaulding & Rogers ultrasonic cleaner made for the tattoo industry.  It heats up and removes paint from models, I have been using Super Clean in this unit and it works great. I have found other medical grade equipment like this at a reasonable price online/eBay.
This thing does most of the work for you and really cleans the paint out of the small detail areas very well.


For those that have asked or will ask, the specs on this unit are.


Tuesday, July 12, 2011

Real Life gets in the way

Long time since my last post, its been a summer full of birthdays and events.  That makes things like blogging and gaming difficult to find the time for.
So this will be random musings today.

First off I am cleaning out old models form the collection, including 20 year old Adeptus Mechanicus Models  http://cgi.ebay.com/ws/eBayISAPI.dll?ViewItem&item=160618006045&ssPageName=STRK:MESELX:IT

Bid early and Bid often, thanks

Also for my birthday Neverness brought his space wolves over and beat me mercilessly.


Finally a thanks to randomguess from DakkaDakka for sending me 5 epic termagants to use as counters on my tervigons, updates pics will follow eventually.